Welcome to Stamp With Nel. I’m glad you’re here.
Today I am bringing you a card I made for the Sunday Stamps Challenge. Challenge SSC321 is a color challenge. For this challenge I had to use three of the color options.

Although the challenge title is Autumn’s Riches, I saw Christmas lights. I chose to use the following colors for my Christmas card:

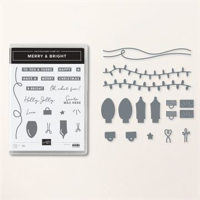
I used a slightly modified stamped one sheet wonder that I saw Robin Armbrecht do several months ago. I used an 8-1/2″ x 11″ sheet of white cardstock with horizontal and vertical center lines lightly drawn in pencil. I then stamped the string for my lights in Tuxedo Black Memento ink along the pencil lines. Since I was working with three blues, I started with stamping three bulb sockets in Cajun Craze ink in each quadrant, lining up with the light string. I stamped the three bulbs – one each of Balmy Blue, Lost Lagoon and Pretty Peacock. Full strength ink was a little strong for the bulbs in my opinion, so I stamped off once before stamping each bulb. Before I put the bulb stamp away, I checked make sure i was happy with the bulb coverage on the paper. In some places I felt I could fit 4 bulbs, but 3 was the average in each quadrant. I then stamped the each light bulb with a filament in full strength ink that matched the bulb color.
I filled in some of the blank spaces with the “Santa Was Here” stamp with Cajun Craze ink. I stamped the star in full strength Pretty Peacock where I felt I had too much white space.
I erased any pencil lines that could still be seen and then trimmed the paper at 4-1/4 x 11, then cut each piece in half again at 5-1/2″. This is a little larger than the final panel will be, but I wanted to make sure that I got the most out of the stamping so I trimmed each quadrant down again to the final size of 5-1/4″ x 4″.

You know I love using an embossing folder and today’s card is no exception. My husband is a lifelong singer and belongs to several choirs, so when I saw the Merry Melody 3D Embossing Folder I knew I had to have it. I embossed the stamped 5-1/4″ x 4″ white panel. I then adhered the stamped panel to a piece of Three Color Glimmer Specialty Paper in Pretty Peacock. This specialty paper is one of the new online exclusives released November 7. I didn’t waste any of the glimmer paper, though. I used a decked rectangle die to cut out the center of the glimmer paper for another use. I used liquid glue to adhere the white panel to the Pretty Peacock glitter paper.
I cut a long length (about 24″) of black bakers twine and wound it around the card front panel three times. I tied a knot on the left side where my sentiment was going to go and trimmed the ribbon short. I used the I used the nested essential dies to cut 2 rectangles cutting the largest rectangle from Lost Lagoon and the 2nd largest from Basic White. I curved the Holly Jolly sentiment from the Merry & Bright stamp set and stamped the sentiment on the Basic White rectangle. I stamped the Christmas sentiment below Holly Jolly in Pretty Peacock and stamped a star in Balmy Blue between the two sentiments. I used liquid glue to adhere the white sentiment panel to the Lost Lagoon sentiment panel offsetting the rectangles.
I used the Merry & Bright dies to cut out a large Balmy Blue bulb, a silver filament from the Silver & Gold Adhesive-Backed Glimmer Paper, a cajun craze socket and a silver socket (also from the glimmer paper). I assembled the bulb and added black baker’s twine through the loop and tucked the excess near the other twine and secured it with a mini glue dot (a dot of glue or Stampin’ Seal would work too – just allow the liquid glue to dry a little) behind the sentiment forming a loop up top. I adhered the bulb to the upper right of the sentiment rectangles with Stampin’ Dimensionals. I adhered the sentiment panel to the front card panel with Stampin’ Dimensionals. I added three silver Festive Pearls to the front card panel. Finally, I adhered the whole front panel to the card front with Stampin’ Dimensionals. Y’all, there are a lot of Dimensionals on this card!!

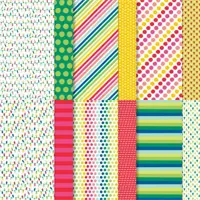
For the inside layer, I cut a 3/8″ strip of Merry Bold & Bright designer series paper and adhered it to the Basic White inside panel with liquid glue. I stamped a Cajun Craze socket, a Tuxedo Black string, a Balmy Blue (stamped off once) bulb and a Balmy Blue filament and the three light lines on the upper left of the inside panel. I adhered the inside panel to the card base with Stampin’ Seal.
For the envelope, I used the Merry Bold & Bright designer series paper on the envelope flap. I stamped another string, socket and Balmy Blue light bulb on the front of the envelope.
Your card is ready to mail – who will you send it to today?
Thank you so much for checking out my blog today. I hope you will make this card. To help you do that, I have both printable instructions and video instructions for you.
Supply List


If you need any supplies to make the card, I would be honored to be your Stampin’ Up demonstrator.
Host Code
May 1 – May 31: Host Code: KGRFRDQK
If you do not already have a demonstrator, I’d be honored to be your Stampin’ Up! Demonstrator.
Use my host code when you order $50 (before tax and shipping) or greater and receive five (5) handmade cards and a variety of 6″ x 6″ double sided Designer Series Paper (a $20 value) FREE from me. You will also receive the monthly online tutorial. The May tutorial features the Adventurous Sky Bundle.
***Make sure that you can see my name, Nel Thames, on the final checkout page listed as your Demonstrator when you order so that you know that you’re ordering with me and you’ll get my rewards! If you forget to add the host code I am not able to add it for you due to privacy reasons. You can call Stampin’ Up! and requested that it be added. Thank you for understanding.


Who knew a tangled mess of lights could make such a great card. Thanks for playing along with our “Autumn’s Riches” color challenge over at Sunday Stamps!! Your rocked our Autumn color palette these retro lights!!
-Deb Horst, DT #SSC321
Thank you so much, Deb.
What a fun card! It has such a retro feel to it, between the challenge colors and the those fab Christmas light bulbs! Thanks for sharing with us at Sunday Stamps!
Thanks, Stef. I appreciate you stopping by.