On Saturday I spent the day in my craft room enjoying my first Stampin’ Up! demonstrator event, OnStage@Home. I got the chance to preview the January to April 2024 mini catalog and have already placed a preorder for *some* of my must have catalog items. I think you’re going to be very excited to see not only the January to April 2024 mini catalog, but also the incredible Saleabration items you can earn for FREE. When my preorder comes, I’ll share what I bought. I’m so excited to start creating it’s like Christmas has come early!!
During the Stampin’ Up! event, demonstrators were able to craft along using the Bee Mine Suite of products that will be available starting in January. As the name implies, this is a Bee themed Valentine’s Day suite that consists of the Bee My Valentine stamp and punch bundle, a ribbon, stampable boxes, embellishments and paper. I think it’s so adorable and I really enjoyed crafting with it today and earlier this week. Here are the cards many demonstrators who attended #OnStage@Home made together today.


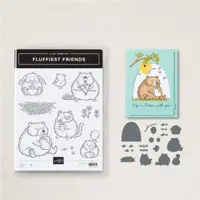
I had also used the Bee Mine designer series paper and the new online exlusives Fluffies Friends bundle on Friday to create a card for the TGIF Challenge #tgifc446. Here is the sketch and my card:


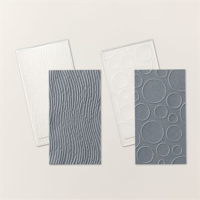
I used a Daffodil Delight cardbase cut to 4-1/4″ x 11″ and scored at 5-1/2″. I selected the honey jar design from the Bee Mine 12″ x 12″ designer series paper and adhered it to the front of the card with liquid glue. I cut a piece of Lemon Lime cardstock and dry embossed it with the circles from the Cheery Patterns Embossing Folders. This set of two embossing folders is great for narrow layers that are 3-1/4″ wide and up to 6″ long. Plus these folders work in the Mini Stampin’ Cut and Emboss Machine. The mini is light and fantastically portable, so it’s great to take on a stamping retreat or crafting weekend.
Before adhering the embossed Lemon Lime Twist layer to the card, I used the three bees stamp from the Fluffiest Friends stamp set and stamped it in Daffodil Delight to the right of the Bee Mine designer series paper. I adhered the Lemon Lime Twist panel to the front of the card, overlapping the Bee Mine designer series paper about 1-1/2″ and leaving approximately 1″ of the Daffodil Delight card base showing on the right side of the card.
I tried several versions of the Fluffiest Friends bear before finally deciding to stamp it in Tuxedo Black Memento ink on Crumb Cake cardstock and only color the honey jar. I used Sweet Sorbet light and dark blends and Daffodil Delight light and dark blends to color the honey and the jar and then added some glittery shine by applying Wink of Stella to just the honey. I love the little bit of sparkle the Wink of Stella gives the honey.
I used the 4th smallest Deckled Circle die to cut a background circle for the bear. I adhered the bear to the right side of the deckled circle with liquid glue, letting part of the circle show over the bear’s shoulder and head. I stamped my sentiment vertically on the card right side edge using Tuxedo Black Memento ink. I used Stampin’ Dimensionals to adhere the bear and circle on the Lemon Lime Twist panel, making sure that the bear’s foot didn’t cover the sentiment.
I used the Mini Stampin’ Cut and Emboss machine and the Fluffiest Friends dies to cut the tree branch, leaves and bee hive. I cut the branch from Soft Suede and the bee hive from Daffodil Delight. I wanted softer colors for my leaves, so I used blending brushes and applied random areas of Lemon Lime Twist, Daffodil Delight and Sweet Sorbet to a panel of Fluid 100 Watercolor Paper. I then applied water to the ink with a water painter. I used the Heat Tool to dry the ink and paper before die cutting the leaves. This die set has 3 double leaves and 4 single leaves and I cut them all. I mean, I had a 5″ x 7″ sheet of watercolored paper so why not?
I adhered the Soft Suede branch to the card sticking the end behind the Daffodil Delight circle. The die cuts the branch to be right facing, but I just turned it over so that it was left facing since that’s what I needed. I chose five of my leaves and adhered four of them to the tree branch with liquid glue. I cut a standard size Stampin’ Dimensional in four pieces and used two of them to adhere the leaf to the branch. I also used Stampin’ Dimensionals to adhere the bee hive to the end of the Soft Suede branch.
Did you know that you can color the white Adhesive-Backed Glitter Sequins with blends? I experimented with coloring them while making another card last week and was happy that the sequins stay sparkly after being colored. I think that makes these embellishments really versatile. I used the dark Daffodil Delight Stampin’ Blends to color three of the white adhesive-backed glitter sequins. I placed one in the bee hive opening and the other two on the card.

I used Basic White for one of the card inside layers with a Sweet Sorbet mat. I stamped the the three flowers from the Fluffiest Friends stamp set on the right corner of the Basic White inside layer and colored the flowers with light Sweet Sorbet Stampin’ Blends. I stamped the three bees using Tuxedo Black Memento ink and colored their little bee bodies with light Daffodil Delight Stampin’ Blends. I used Stampin’ Seal to attach the Basic White inside layer to the Sweet Sorbet mat and then used liquid glue to adhere the whole piece to the cardbase.
I cut a 2-1/4″ x 6″ piece of Bee Mine designer series paper for my envelope flap. I adhered it to the envelope flap with liquid glue and trimmed it with my paper snips. I stamped the three little bees twice on the front of the envelope using Daffodil Delight ink. My card is now ready to mail.
Thank you for stopping by my blog today. I appreciate your time and hope that you enjoyed reading about this card. If you’d like to make the card yourself, I’ve included a printable PDF with instructions and measurements. Please use the hashtag #stampwithnel on Instagram and Facebook if you make this card. I’d love to see yours.


Host Code
May 1 – May 31: Host Code: KGRFRDQK
If you do not already have a demonstrator, I’d be honored to be your Stampin’ Up! Demonstrator.
Use my host code when you order $50 (before tax and shipping) or greater and receive five (5) handmade cards and a variety of 6″ x 6″ double sided Designer Series Paper (a $20 value) FREE from me. You will also receive the monthly online tutorial. The May tutorial features the Adventurous Sky Bundle.
***Make sure that you can see my name, Nel Thames, on the final checkout page listed as your Demonstrator when you order so that you know that you’re ordering with me and you’ll get my rewards! If you forget to add the host code I am not able to add it for you due to privacy reasons. You can call Stampin’ Up! and requested that it be added. Thank you for understanding.


Adorable cards, Nel – and so happy you had fun! See in PERSON in March in Houston. Right?! 😉
Yes!! In PERSON in March. I’m really looking forward to it. Thanks for stopping by, Mary.