Hello and blessed Sunday to y’all. Thank you for stopping by my blog today. I hope that if you’re in a Spring Ahead time zone you’re able to adjust to the time change soon. I love Fall Back, but Spring Ahead is not really my style. Plus, y’all know our senior pup, Pixie, is a very early riser. Time changes mean nothing to her.

Today’s blog is not my typical blog. First, I’m keeping it short as I will doing a live tutorial on it tonight (Sunday March 10) at 6 pm CDT on YouTube and Facebook. If you don’t follow me on YouTube, please check out my channel at YouTube.com/@stampwithnel. While there you can subscribe to my channel. If you set your notifications to all you will get a notice when I go live with a video. Since next week I’ll be in Houston, TX at the Stampin’ Up! Onstage event I may pop in on Facebook and/or YouTube with a live update on what I’ve learned – this will include the 2024-2026 in colors, new products and maybe more! It’s the first Onstage I’ll attend live, so I’m not sure what I’ll learn.
Secondly, I didn’t make a card today. Rather, today I have a little treat box for y’all. I’m bringing a few treats for my team mates (I heard chocolate is a MUST at an SU! event), so I thought the treat boxes I made would be fun to share with y’all.
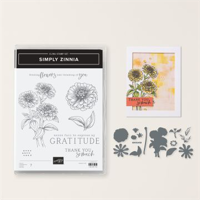
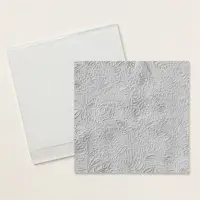
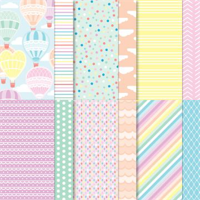
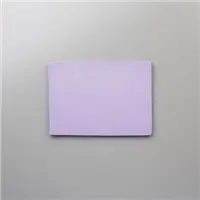
Finally, although I used the Simply Zinnia Bundle and the Zinnia 3D Embossing folder, I did not use the Flowering Zinnia paper or embellishments. Instead I used the Spring-y Lighter Than Air 6″ x 6″ designer series paper and color palette for my project. I know that I don’t have to use coordinating suite products, but I do tend to do so. So today I step way out of my blog comfort zone with this atypical blog post. Here we go —

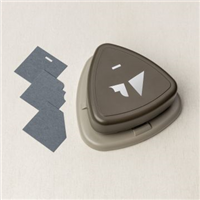
I learned how to make this treat box from fellow demonstrator Anne Marie Hile. I chose a base of Petal Pink for this box and stamped it with the Simply Zinnia Stamp Set flower, leaves and texture stamps with Petal Pink ink. I used the Very Best Trio punch to make the decorative edges on the outer box.
I cut two pieces of Lighter Than Air DSP to decorate the upper and lower areas of the inside of the outer box. I used the Very Best Trio punch to cut the decorative edges for both sides. I also cut a Basic White panel and used the Very Best Trio punch again for the decorative edges. This will be for the note to the recipient. I adhered the DSP to upper and lower insides with liquid glue, then added the Basic White panel over the top DSP.

I made the interior pocket with Petal Pink cardstock and used a circle punch to cut a notch out of the center of the pocket. I used Tear & Tape to adhere the pocket to the inside of the card between the score lines.
I cut a belly band of Petal Pink and used the Zinnia 3D Embossing Folder to dry emboss it. I prepared an 11″ belly band, knowing that I would not need it all. I found that an 8-1/2″ belly band was a bit too tight for my purposes. I added my goodies to the inside pocket and determined the length of belly band needed when the treat box was full so I wouldn’t make it too tight. I creased the belly band where I needed the folds to get around the box, burnished them with my bone folder a trimmed the belly band to the right size before adhering the overlap with liquid glue.

I used the Simply Zinnia Bundle Dies to die cut the pieces for a flower: base (Fresh Freesia), middle petals (Balmy Blue), upper petals (Bubble Bath), flower center (Petal Pink), disk florets (Lemon Lolly) and the Azure Afternoon stamped double leaves. I adhered the flower pieces together with liquid glue and adhered the flower to the belly band with Stampin’ Dimensionals, covering the overlapping areas with the flower. I added three Pastel Adhesive-Backed Sequins – one each of color – to the belly band.
And that’s it for today’s blog in all its shortness and sweetness. I hope you’ll check out the video tutorial live tonight, Sunday March 10, at 6 pm CDT. If you miss it, I will post the video to this post.
Thank you to my 100th subscriber
I’ve reached 100 subscribers – LS was was my 100th subscriber and received the Cane Weave Embossing Folder. Thank you to all my subscribers – I appreciate each and every one of you.
If you’re not already a blog and/or newsletter subscriber please sign up today to receive my blog updates and/or my weekly newsletter. Please feel free to share my blog with your crafty friends.
Today’s Supplies:


Host Code
May 1 – May 31: Host Code: KGRFRDQK
If you do not already have a demonstrator, I’d be honored to be your Stampin’ Up! Demonstrator.
Use my host code when you order $50 (before tax and shipping) or greater and receive five (5) handmade cards and a variety of 6″ x 6″ double sided Designer Series Paper (a $20 value) FREE from me. You will also receive the monthly online tutorial. The May tutorial features the Adventurous Sky Bundle.
***Make sure that you can see my name, Nel Thames, on the final checkout page listed as your Demonstrator when you order so that you know that you’re ordering with me and you’ll get my rewards! If you forget to add the host code I am not able to add it for you due to privacy reasons. You can call Stampin’ Up! and requested that it be added. Thank you for understanding.

Retired Stampin’ Up! Products
My online Stampin’ Up! retired product store has been refreshed with additional products. I will be adding more retired products as I come across them. I have a variety of stamps, dies and embellishments. My stamps and dies are all gently used and most were purchased within the last two years (although some may be “vintage”). Dies might be on magnet cards as I did not start saving the original packaging until just recently. Designer Series Paper and embellishments are new in unopened packages unless otherwise stated.
Due to Stampin’ Up! policies, I can only ship to U. S. addresses.
Shop my online store here.


Super cute! SO looking forward to meeting and spending a few days with you in Houston! Whoo-hoo!! And – whoever told you chocolate is a must…well, she’s a genius! 😉
Such a cute little treat box! Love the fun colors. 🙂