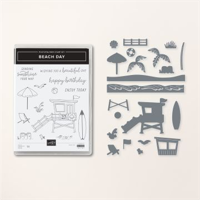
Hello and happy Tuesday, y’all. Every week, this day sort of sneaks up on me and Monday night I’m crazily crafting so I have a blog on Tuesday. This week, however, I have a new stamp set to play with. Say hello to the Beach Day Bundle.

I received my order with new stamps and dies on Friday and have been itching to play with the Beach Day bundle. I’ve previously told y’all that with my first go around with most sets I like to CASE (copy and share everything or copy and selectively edit) the Stampin’ Up! designers following the “recipes” that Stampin’ Up! supplies demonstrators. To call these a recipe is a slight exaggeration – it’s like trying to pin down your grandmother on a recipe she’s made from memory for many, many years. She’s knows the ingredients, but not the amounts. Stampin’ Up! gives us the supply list and a photo – the rest is up to me as a card maker to interpret the card. So, here we go.
I selected this recipe because I love the tone on tone stamping of the darling little beach images including a seagull, sandcastle, beach ball, sand grass and shells. I have a piece of Sweet Sorbet cardstock cut at 4″ x 5-1/4″. I stamped the images randomly using Sweet Sorbet ink on the front panel. Then, using Tuxedo Black Memento ink, I stamped the beach chair and beach umbrella. I used light and dark Bubble Bath Stampin’ Blends to color the beach chair and light and dark Pool Party Stampin’ Blends to color the umbrella. I used the Beach Day dies and the Stampin’ Cut & Emboss machine to die cut the beach chair and umbrella.

I used the long hill die to cut two pieces of sand hills, offsetting the hills. I layered one hill on top of the other and adhered them together with liquid glue. I adhered the Crumb Cake hills to a piece of Basic White cardstock. I used the largest Stylish Shapes die to cut a circle from the Crumb Cake and Basic White scene I just made. I used the largest Stylish Shapes die and the 2nd largest die to cut a Crumb Cake frame. Finally, I used the 2nd largest Stylish Shapes die to cut a circle in the Sweet Sorbet front panel.

I used liquid glue on the back of the Sweet Sorbet front panel around the circle and adhered the beach scene panel to the circle. I then used small dots of liquid glue around the Crumb Cake frame and adhered it to the front of the card. I adhered the Beach Day stamp set chair to the beach scene. For the umbrella, I used liquid glue on the pole only and used small Stampin’ Dimensionals under the umbrella itself to pop it up just a little.
With Sweet Sorbet ink, I stamped the sentiment on a piece of Basic White card stock. I used the 4th largest Stylish Shapes die to cut the sentiment. I adhered the sentiment to the front of the card using Stampin’ Dimensionals. I added five Rainbow Adhesive-Backed Dots in Bubble Bath and Pool Party to the front panel before adding Stampin’ Dimensionals to the back of the panel and adhere it to the Sweet Sorbet card base.

For the inside panel, I cut a 4″ x 5-1/4″ of Basic White card stock. I used Crumb Cake ink to stamp the Beach Day small images on the panel. I used Stampin’ Seal to adhere the Basic White panel to the card base.
On the envelope, I stamped the lifeguard station in Tuxedo Black ink on the envelope flap. I used light Granny Apple Green, dark Azure Afternoon, light Smoky Slate, light Gray Granite and light Crumb Cake Stampin’ Blends to color the lifeguard station leaving most of it white. For the front of the envelope, I stamped a surf board on the envelope and then stamped the surf board on a sticky note. I fussy cut the sticky note surfboard and placed it over the surf board as a mask. With the sand grass image from the Beach Day stamp set, I stamped twice with Crumb Cake ink. I then placed a window sheet in the envelope to prevent bleed through and colored the surfboard with Lemon Lolly Stampin’ Blends.

Thank you!
Thank you so much for coming to my blog today. I hope you make this card – if you do, please tag me at #StampWithNel.
I typically post card blogs on Sunday, Tuesday and Thursday and email a newsletter on Wednesdays. I very much appreciate every visitor and every comment. I hope you found something here that encourages you to return for my next blog post. It’s my pleasure to help you nurture your creativity.
Join me for a free live cardmaking class every Sunday at 6 pm central. You may view the class live on Facebook or YouTube. You can find my Facebook page here and the Stamp With Nel YouTube channel (@stampwithnel) here. I invite you to join me for the class or watch it on the replay.
Well, I’ve got to tell you I’m ready for the beach now. It’s definitely my happy place. I guess if I can’t go to the beach, making cards with the Beach Day bundle is a good second choice. Have a warm and happy day, y’all.


Host Code
May 1 – May 31: Host Code: KGRFRDQK
If you do not already have a demonstrator, I’d be honored to be your Stampin’ Up! Demonstrator.
Use my host code when you order $50 (before tax and shipping) or greater and receive five (5) handmade cards and a variety of 6″ x 6″ double sided Designer Series Paper (a $20 value) FREE from me. You will also receive the monthly online tutorial. The May tutorial features the Adventurous Sky Bundle.
***Make sure that you can see my name, Nel Thames, on the final checkout page listed as your Demonstrator when you order so that you know that you’re ordering with me and you’ll get my rewards! If you forget to add the host code I am not able to add it for you due to privacy reasons. You can call Stampin’ Up! and requested that it be added. Thank you for understanding.

Retired Stampin’ Up! Products
My online Stampin’ Up! retired product store has been refreshed with additional products. I will be adding more retired products as I come across them. I have a variety of stamps, dies and embellishments. My stamps and dies are all gently used and most were purchased within the last two years (although some may be “vintage”). Dies might be on magnet cards as I did not start saving the original packaging until just recently. Designer Series Paper and embellishments are new in unopened packages unless otherwise stated.
Due to Stampin’ Up! policies, I can only ship to U. S. addresses.
Shop my online store here.
Subscribe to the April Paper Pumpkin – April 11 – May 10

Do you subscribe to Paper Pumpkin? Paper Pumpkin is a monthly subscription that provides a unique variety of paper projects for new and experienced crafters alike. Part of the fun of Paper Pumpkin is that the contents are a surprise every month.
MAY: The Best There Is
Subscribe 11 April–10 May
Make cards for Father’s Day and more to express your gratitude and admiration!
- Makes 9 cards: 3 each of 3 designs with 9 coordinating envelopes
- Precut paper pieces and butterfly designs
- Champagne foil images, sentiments, and labels
- Coordinating colors: Lost Lagoon, Moody Mauve, Basic Beige, Basic Gray
(Classic Stampin’ Spot), Basic Black, champagne foil
For more information
scan the QR code
Coordinates with the Country Woods Designer Series Paper (item 163393).
It’s easy to subscribe to Paper Pumpkin by clicking here! Supplies may be limited towards the end of the subscription period.
Starting in January 2024, Paper Pumpkin kits will coordinate each quarter and have a set of Add-On dies available for purchase while supplies last. You can find this quarter’s dies here. Please note you must be a current Paper Pumpkin subscriber to order the dies.


LOL – looks like you broke the recipe code!! Very pretty card – that tone-on-tone is perfect! 🙂
I love the tone-on-tone. It’s what drew me to this card.
Such a cute card Nel! Love the framing around the little beach chair. 🙂