Hello and welcome to my Sunday blog. Today’s card is fairly easy and basically monochromatic. I love the embossed panel and the embossed pop out square which brings some lovely attention to the embossing folder. I’ve used this folder a lot lately because 1) new product is always fun to play with and 2) because it’s just BEAUTIFUL! Such bold and pretty flowers.
Originally I made this card in Bubble Bath and Very Vanilla

I liked it, but wondered what Bubble Bath and Basic White would look like.

Which do you like better? There isn’t much of the contrasting color on the card until the sentiment panel, so I’m happy with both. I guess that’s called a non-answer 🙂 The only real difference I saw was that the Stampin’ Blends show better and more true to color on the Basic White envelope. I wrote the blog using the Bubble Bath and Very Vanilla colors.
I used Bubble Bath for this card, but of course you could use your favorite color. I cut a card base of 4-1/4″ x 11″ scored at 5-1/2″. I then cut a Bubble Bath panel at 4″ x 5-1/4″ and a square at 3″ x 3″. I laid the square on the front panel approximately 1/4″ from the top and 1/4″ from the side (I used grid paper to help with this). I placed 2/3 of the front panel in the embossing folder and used the Stampin’ Cut & Emboss machine to dry emboss the card panel.

I cut a 3-1/8″ x 3-1/8″ square of Very Vanilla card stock and adhered the Bubble Bath square to the Very Vanilla square. I used Stampin’ Dimensionals on the back of the square and adhered it to front of the card panel with the Bubble Bath square approximately 1/4″ from the top and 1/4″ from the side of the panel. I added the 3/8″ Sheer Ribbon Combo Pack Ribbon in Bubble Bath. This ribbon is so pretty in person as it has a silver threaded border which I think is hard to see in the catalog or online photos. I applied the ribbon to the panel front and adhered the edges on the back with Stampin’ Seal+. I tied a knot around the front of the Bubble Bath ribbon to make a faux bow (truly one of my favorite ways to tie ribbon). I trimmed the tails of the bow to the length I wanted and then placed a mini glue dot under the bow knot.

To the bottom portion of the card, I added three Rainbow Adhesive-Backed Dots in Bubble Bath – 2 small and 1 large. I then stamped the FREE Sale-A-Bration Heartfelt Hellos stamp set Enjoy Your Day sentiment on the front of the card with Bubble Bath Ink. I used Stampin’ Dimensionals to adhere the front panel to the card base.

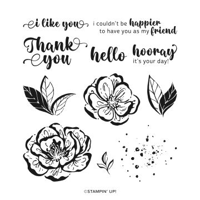
For the inside of the card, I cut a 4″ x 5-1/4″ piece of Very Vanilla card stock. I stamped the Heartfelt Hellos stamp set Happy Mother’s Day sentiment at the top of the panel. I added a flower from the Irresistible Blooms stamp set to the bottom of the sentiment panel. I adhered the sentiment panel to the inside of the card with Stampin’ Seal.

I chose a Very Vanilla envelope for this card. I used the light Bubble Bath Stampin’ Blends to make a cross hatch pattern on the envelope flap. Again I used the Irresistible Blooms stamp set flower on the front of the envelope.
I hope you enjoyed today’s card. Thank you for checking out my blog. Join me for a free Facebook Live Cardmaking Class every Sunday at 6 pm CST. You can find my Facebook page here. I upload the recorded video to my YouTube channel here the same evening. I invite you to join me for the class or watch it on the replay.
This card will be the subject of tonight’s (January 21, 2024) Facebook Live referenced above. The video will be uploaded here and on YouTube after the Live concludes.


Host Code
May 1 – May 31: Host Code: KGRFRDQK
If you do not already have a demonstrator, I’d be honored to be your Stampin’ Up! Demonstrator.
Use my host code when you order $50 (before tax and shipping) or greater and receive five (5) handmade cards and a variety of 6″ x 6″ double sided Designer Series Paper (a $20 value) FREE from me. You will also receive the monthly online tutorial. The May tutorial features the Adventurous Sky Bundle.
***Make sure that you can see my name, Nel Thames, on the final checkout page listed as your Demonstrator when you order so that you know that you’re ordering with me and you’ll get my rewards! If you forget to add the host code I am not able to add it for you due to privacy reasons. You can call Stampin’ Up! and requested that it be added. Thank you for understanding.

Retired Stampin’ Up! Products
My online Stampin’ Up! retired product store has been refreshed with additional products. I will be adding more retired products as I come across them. I have a variety of stamps, dies and embellishments. My stamps and dies are all gently used and most were purchased within the last two years (although some may be “vintage”). Dies might be on magnet cards as I did not start saving the original packaging until just recently. Designer Series Paper and embellishments are new in unopened packages unless otherwise stated.
Due to Stampin’ Up! policies, I can only ship to U. S. addresses.
Shop my online store here.
My notes about the January Paper Pumpkin box

Y’all, I put together my January 2024 Paper Pumpkin kit last night while watching the Texans lose to the Ravens. Frankly, making the Paper Pumpkin projects was waaaay more fun for me :).

This month’s Paper Pumpkin box included two card variations and a set of tags. I love that the tags punch out of a panel and the panel is used for another card.

While it’s too late to get the January Paper Pumpkin box, don’t miss out on getting the February box and the Add-On dies* (item 164396). One other thing – if you LOVE your Paper Pumpkin when you receive it you might be able to order refill packs*. These will have everything you need to make more of your favorite Paper Pumpkin kits except the stamps and ink which you received in the monthly box. If you like the original Paper Pumpkin projects, there are also a lot of alternate projects posted for you to try each month. How do you Paper Pumpkin? With the originals? Or the alternates? * You must be a Paper Pumpkin subscriber to order the Add-On dies and refills.
Subscribe to the April Paper Pumpkin – April 11 – May 10

Do you subscribe to Paper Pumpkin? Paper Pumpkin is a monthly subscription that provides a unique variety of paper projects for new and experienced crafters alike. Part of the fun of Paper Pumpkin is that the contents are a surprise every month.
MAY: The Best There Is
Subscribe 11 April–10 May
Make cards for Father’s Day and more to express your gratitude and admiration!
- Makes 9 cards: 3 each of 3 designs with 9 coordinating envelopes
- Precut paper pieces and butterfly designs
- Champagne foil images, sentiments, and labels
- Coordinating colors: Lost Lagoon, Moody Mauve, Basic Beige, Basic Gray
(Classic Stampin’ Spot), Basic Black, champagne foil
For more information
scan the QR code
Coordinates with the Country Woods Designer Series Paper (item 163393).
It’s easy to subscribe to Paper Pumpkin by clicking here! Supplies may be limited towards the end of the subscription period.
Starting in January 2024, Paper Pumpkin kits will coordinate each quarter and have a set of Add-On dies available for purchase while supplies last. You can find this quarter’s dies here. Please note you must be a current Paper Pumpkin subscriber to order the dies.


Gorgoeus – love that embossing! 🙂
Embossing is one of my favorite techniques ♥️
Very pretty Nel! Love the layering and the embossed panel adds the perfect touch! 🙂
Thanks, Amy!