

Welcome blog hoppers! I’m so glad you’re here today.
In Texas we do BIG well. If y’all have heard of our famous Beaver and his HUGE travel centers, you’ll know why my Cupid friend is a Beaver. It’s just so – Texas!! Although I tried not to make it TOOOO obvious, he’s even wearing a diaper like Cupid. Instead of a bow and arrow, he’s giving y’all his heart.
Sooo, now that told you about my Fluffiest Friend Cupid, let’s talk about the hop. We have a Love theme this week which is certainly appropriate since Valentine’s Day is right around the corner. I think I might have skipped right over Valentine’s Day cards and headed straight to Mother’s Day, so let’s put on the Mother’s Day brakes and head back to Valentine’s Day.

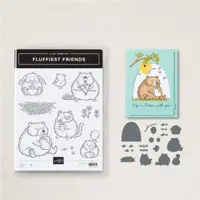
The Fluffiest Friends stamp set has the cutest beaver, which I stamped onto Basic White cardstock with Tuxedo Black Memento ink. I used quite a large variety of Stampin’ Blends to color the Fluffiest Friends stamp set Beaver as I was experimenting with shading and color differences.
After coloring the Fluffiest Friends stamp set beaver, I used the Fluffiest Friends dies and the Mini Stampin’ Cut and Emboss machine to die cut the beaver. With the Bee My Valentine stamp set, I stamped two wing tips with Tuxedo Black Memento ink on the striped Vellum Basics 12″ x 12″ Specialty Designer Series Paper. I then used the Bee Builder Punch to punch the two Vellum wings and two 2023-2025 In Color 12″ x 12″ Luster Specialty Paper in Copper Clay. I used a small dot of liquid glue at the bottom of the cut out and adhered the Vellum wings over the Copper Clay Luster wings. With liquid glue again, I glued the wings to the Fluffiest Friends stamp set Beaver.

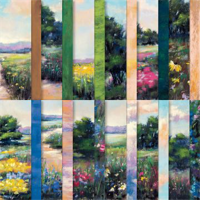
I ordered the Meandering Meadows 6″ x 6″ designer series paper when it first became available to demonstrators months ago. I’ve seen other crafters use it, but it’s so beautiful I was saving it for a rainy day. Well, let me tell you that Texas has been dreary and rainy for about 5 days now after a long period of really, really cold weather (for the South). So, out comes the Meandering Meadows designer series paper as it a beautiful place for Beaver Cupid to be flying over.

I cut the Meandering Meadows DSP to 4″ x 5-1/4″ DSP and used the embossing buddy over the center of the paper. I stamped the Bee trail in VersaMark and sprinkled it with Gold Metallics Embossing Power and tapped off the excess. I repeated the sprinkling and tapping once more for good coverage. After warming up my heat tool on the 2nd speed, I applied heat to the Gold Metallics Embossing Powder until it was shiny a beautiful. While I was embossing, I also stamped the Bee My Valentine sentiment on Petal Pink card stock with VersaMark (after swiping with the embossing buddy) and covered it in Gold Metallics Embossing Powder. I heated it with the heat tool to make it pretty and shiny.
With liquid glue, I adhered the DSP to the Balmy Blue 4-1/8″ x 5-3/8″ panel. I used Stampin’ Dimensionals to place the Fluffiest Friends stamp set Beaver Cupid at the end of the flight trail. I cut a 5-1/2″ length of Night of Navy and Gold 1/2″ Glittered Ribbon and then cut it in half lengthwise before adhereing the ribbon to the card front panel with Stampin’ Seal on the back side of the mat. The Double Oval punch is perfect for the sentiment here, so I used the smooth edged oval to punch the sentiment and the decorative edged oval to punch from the Meandering Meadows 6″ x 6″ Designer Series Paper.

I adhered the sentiment to the decorative edge oval with liquid glue. After adding Stampin’ Dimensionals to the back of the matted sentiment, I adhered the sentiment over the Night of Navy and Gold 1/2″ Glittered Ribbon towards the left edge. I added two small and one large Blooming Pearls in Gold to the front of the card panel. With Stampin’ Dimensionals placed on the back of the entire matted panel, I adhered the front panel to the front of the 5-1/2″ x 8-1/2″ Petal Pink card base.

I cut a 4-1/8″ x 5-3/8″ Crushed Curry mat and a 4″ x 5-1/4″ Basic White panel. With Highland Heather ink, I stamped the Bee My Valentine stamp set sentiment on the Basic White panel. For the lower right corner decoration, I used Crushed Curry ink and stamped the honeycomb three times. Next up is the bee trio from the Bee My Valentine stamp set stamped in Tuxedo Black Memento ink over the honeycomb. Finally, I added a single heart from the same stamp set in Cherry Cobbler. To add a little bling, I colored the heart with Wink of Stella. I used Stampin’ Seal to adhere the Basic White sentiment panel to the Crushed Curry mat and then used liquid glue to adhere the matted panel to the card base.

For the envelope flap, I cut a 2-1/4″ x 6″ which I adhered to the envelope with liquid glue before trimming off the excess with paper snips. I used the Bee My Valentine stamp set honeycomb with Crushed Curry ink to stamp twice up the left side of the envelope. I stamped the trio of bees in Tuxedo Black Memento ink three times without reinking over the honeycomb stamp. I then used the Bee My Valentine stamp set trio of hearts and stamped it three times on the front of the envelope without reinking.
Thank you!
Thank you so much for coming to my blog today. I hope you make this card – if you do, please tag me at #StampWithNel.
I typically post card blogs on Sunday, Tuesday and Thursday and email a newsletter on Wednesdays. I very much appreciate every visitor and every comment. I hope you found something here that encourages you to return for my next blog post. It’s my pleasure to help you nurture your creativity.
Join me for a free live cardmaking class every Sunday at 6 pm central. You may view the class live on Facebook or YouTube. You can find my Facebook page here and the Stamp With Nel YouTube channel (@stampwithnel) here. I invite you to join me for the class or watch it on the replay.

- Amy Koenders
- Mary Deatherage
- Jaimie Babarczy
- Karen Finkle
- Akiko Sudano
- Karen Ksenzakovic
- Tara Carpenter
- Terry Lynn Bright
- Carol Buckalew
- Nel Thames


Price: $10.00
Price: $11.00


Host Code
May 1 – May 31: Host Code: KGRFRDQK
If you do not already have a demonstrator, I’d be honored to be your Stampin’ Up! Demonstrator.
Use my host code when you order $50 (before tax and shipping) or greater and receive five (5) handmade cards and a variety of 6″ x 6″ double sided Designer Series Paper (a $20 value) FREE from me. You will also receive the monthly online tutorial. The May tutorial features the Adventurous Sky Bundle.
***Make sure that you can see my name, Nel Thames, on the final checkout page listed as your Demonstrator when you order so that you know that you’re ordering with me and you’ll get my rewards! If you forget to add the host code I am not able to add it for you due to privacy reasons. You can call Stampin’ Up! and requested that it be added. Thank you for understanding.

Retired Stampin’ Up! Products
My online Stampin’ Up! retired product store has been refreshed with additional products. I will be adding more retired products as I come across them. I have a variety of stamps, dies and embellishments. My stamps and dies are all gently used and most were purchased within the last two years (although some may be “vintage”). Dies might be on magnet cards as I did not start saving the original packaging until just recently. Designer Series Paper and embellishments are new in unopened packages unless otherwise stated.
Due to Stampin’ Up! policies, I can only ship to U. S. addresses.
Shop my online store here.
Subscribe to the April Paper Pumpkin – April 11 – May 10

Do you subscribe to Paper Pumpkin? Paper Pumpkin is a monthly subscription that provides a unique variety of paper projects for new and experienced crafters alike. Part of the fun of Paper Pumpkin is that the contents are a surprise every month.
MAY: The Best There Is
Subscribe 11 April–10 May
Make cards for Father’s Day and more to express your gratitude and admiration!
- Makes 9 cards: 3 each of 3 designs with 9 coordinating envelopes
- Precut paper pieces and butterfly designs
- Champagne foil images, sentiments, and labels
- Coordinating colors: Lost Lagoon, Moody Mauve, Basic Beige, Basic Gray
(Classic Stampin’ Spot), Basic Black, champagne foil
For more information
scan the QR code
Coordinates with the Country Woods Designer Series Paper (item 163393).
It’s easy to subscribe to Paper Pumpkin by clicking here! Supplies may be limited towards the end of the subscription period.
Starting in January 2024, Paper Pumpkin kits will coordinate each quarter and have a set of Add-On dies available for purchase while supplies last. You can find this quarter’s dies here. Please note you must be a current Paper Pumpkin subscriber to order the dies.


WHOA! A flying beaver??? Well, why not? 🙂
I love your beaver cupid. So fun. Great way to use a fluffiest friend.
I took a chance and he surprisingly flew lol. 😂
Too cute and clever! Love the beaver cupid! 😊
Thank you so much, Akiko.
Your Buccee Beaver card cracked me up! I have friends who are obsessed with that lil guy 🤣 Very cute card and kudos to you for thinking outside the box 🙌🏻
Thanks so much Judi. My husband and I stop at every Buc ees we find when traveling. I understand your friends’ obsession. ♥️
That’s so cute Nel! Love your little critter flying by. 🙂
I had no idea beavers were so big in Texas…and yours certainly makes an adorable cupid! Cute card for Valentine’s Day!
Everything is bigger in Texas – especially friendly beavers. Lol
Buckeee!!! Too stinkin’ cute, Nel!
Too cute! TFS
Thanks Tara
Very cute card Nel. Love that little (BIG) beaver.
Thanks Karen!!