My cousin, Summer, is a morning radio personality in the Washington DC area. I learn a lot about her family when I’m crafting and listening to her on the radio between 4 am and 7 am CST. One morning she was talking about her oldest daughter’s bike accident. I saw the photos after the morning show and ouch! That was some wreck. Gratefully both scared mom and injured child are fine. One of the standouts in the story was her second daughter who was outside with her sister while they traded off riding a bike. She kicked it into high gear when her sister wrecked and made sure mom knew something had happened. Everyone was scared, but all reacted with strength and concern for each other.


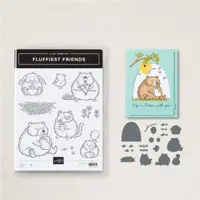
My cards today were made for my young cousins. What better set to use than the Fluffiest Friends Bundle? Since both girls have names for which they can never find personalized items, I wanted to make them extra special by using the new Mini Alphabet Dies – available in the Jan – Apr 2024 Mini Catalog on 4 Jan 2024. My given name is Donnelle and believe me, I understand the struggle of no one ever having my name in a personalized frame.
For my injured cousin, Aurelya, I chose the Fluffiest Friends Stamp Set bear and bee friends. Arwyn is a cat lover, so I chose the cat for her card. Both cards are made the same using different stamps. For simplicity sake we’ll focus on Aurelya’s card.
I found that the best way to keep the animals in the “frame” of the cutout was to do the cutout first, so I used a 5-1/4 x 4″ panel and the Fluffiest Friends Bundle dies to cut out the curved frame from the panel. I placed the die about 1-1/2″ up from the bottom and centered it from left to right. I cut a piece of Basic White larger than the opening and traced the inside of the opening very lightly with pencil on the Basic White panel. Now I could stamp my animal and friends within the frame so I knew what would show. I did stamp over the lines with the bees, but I kept the bear fully in the frame.

With Tuxedo Black Memento ink, I stamped the bear near the bottom of the penciled line. I colored it with light and dark Crumb Cake Stampin’ Blends and used Daffodil Delight for the honey. I left the honey pot white. I stamped the bees in black and colored their bodies with the light Daffodil Delight.
I used the Fluffiest Friends dies and the Stampin’ Cut and Emboss machine to die cut the Soft Suede branch, Old Olive leaves and the Daffodil Delight bee hive. I used dark Daffodil Delight Stampin’ Blends to darken the hive lines and Basic Black to color the hive entrance. I die cut three grass pieces from Old Olive cardstock and glued them over the bottom of the bear where the frame opening would be. I adhered the Basic White bear panel to the backside of the frame with liquid glue

I adhered the branch, leaves and bee hive to the front panel with liquid glue. With my paper trimmer, I cut a 1″ wide strip for the name and used the Banners Pick A Punch to flag the end. I adhered an adhesive sheet to my Daffodil Delight cardstock and cut the Mini Alphabet Die letters with the Stampin’ Cut and Emboss machine. The dies will also fit in the Mini Stampin’ Cut and Emboss Machine. I selected the letters I needed and adhered them to my banner, then cut the right side banner tails with the Banners Pick A Punch.

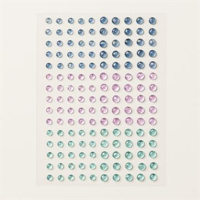
I adhered the banner to the front panel with Stampin’ Dimensionals and then adhered the panel to the card base. I added 3 Lost Lagoon gems from the Tinsel Gems Three-Pack to the card front.
I used a Basic White inside panel and stamped the three flowers and bees on the bottom right corner. With Stampin’ Blends in light Bubble Bath and light Old Olive, I colored the flowers. I colored the bee bodies with light Daffodil Delights Stampin’ Blends. I adhered the inside panel to the card base with Stampin’ Seal+.
On to the envelope. Since I didn’t use DSP I stamped the bees and flowers in random patterns on the envelope flap. I used the same blends to color the flowers and the bees. I stamped the bird from the Fluffiest Friends Stamp Set on the front of the envelope in Tuxedo Black Memento ink. It is good practice to use a window sheet or an insert from the photopolymer stamps inside an envelope before coloring with blends. I colored the bird with Daffodil Delight and Azure Afternoon Stampin’ Blends. I used Wink of Stella on the bird’s blue wings for extra bling.
I hope you find this personalized card fun to make. There’s so much fun to be had with the Mini Alphabet Dies. Who will you make a personalized card for?


Host Code
May 1 – May 31: Host Code: KGRFRDQK
If you do not already have a demonstrator, I’d be honored to be your Stampin’ Up! Demonstrator.
Use my host code when you order $50 (before tax and shipping) or greater and receive five (5) handmade cards and a variety of 6″ x 6″ double sided Designer Series Paper (a $20 value) FREE from me. You will also receive the monthly online tutorial. The May tutorial features the Adventurous Sky Bundle.
***Make sure that you can see my name, Nel Thames, on the final checkout page listed as your Demonstrator when you order so that you know that you’re ordering with me and you’ll get my rewards! If you forget to add the host code I am not able to add it for you due to privacy reasons. You can call Stampin’ Up! and requested that it be added. Thank you for understanding.

Jan – Apr 2024 Mini Catalog Product Shares

Find all the details about my product shares on my blog here.
Subscribe to the April Paper Pumpkin – April 11 – May 10

Do you subscribe to Paper Pumpkin? Paper Pumpkin is a monthly subscription that provides a unique variety of paper projects for new and experienced crafters alike. Part of the fun of Paper Pumpkin is that the contents are a surprise every month.
MAY: The Best There Is
Subscribe 11 April–10 May
Make cards for Father’s Day and more to express your gratitude and admiration!
- Makes 9 cards: 3 each of 3 designs with 9 coordinating envelopes
- Precut paper pieces and butterfly designs
- Champagne foil images, sentiments, and labels
- Coordinating colors: Lost Lagoon, Moody Mauve, Basic Beige, Basic Gray
(Classic Stampin’ Spot), Basic Black, champagne foil
For more information
scan the QR code
Coordinates with the Country Woods Designer Series Paper (item 163393).
It’s easy to subscribe to Paper Pumpkin by clicking here! Supplies may be limited towards the end of the subscription period.
Starting in January 2024, Paper Pumpkin kits will coordinate each quarter and have a set of Add-On dies available for purchase while supplies last. You can find this quarter’s dies here. Please note you must be a current Paper Pumpkin subscriber to order the dies.

Last Chance Sale 21 Nov 2023 to 3 Jan 2024
A new catalog is exciting, but it also means we have to say goodbye to some products. Beginning 21 November 2023 through 3 Jan 2024, Last Chance Products will be on sale. Not every product on the retiring list will be leaving (bundles, for example, may be retiring, but the individual pieces might still be available) but what is retiring will go quickly. Make sure you get your favorites before they are gone forever.
Below are the Last Chance Sale carryover and retiring lists in Excel format. The retiring list is in landscape to allow for increased font size. These lists were last updated on 27 Dec 2023 at 8:00 pm.


So darned cute – and I am SO glad that Aurelya is okay! Good for Arwyn for getting the job done, too! They both have lovely names – and fie on the personalization world! :). Glad that you can make something darling JUST for them! 🙂
I can make lots of personalized cards now. ♥️
Oh my goodness, how cute!! Love the way that you’ve personalized the cards, sweet little bear images too! 🙂
Thanks so much, Amy.