
Welcome to the first Happy Inkin’ Thursday Blog Hop of 2024. I’m diving into some fun folds this week and next, so I hope you enjoy them.

Today’s we are using a sketch for inspiration. It is getting easier for me to see a card when I see a sketch. I am a firm believer that you can encourage creativity just by using it. Like anything else, practice makes – if not perfect – better.

The Cutest Cow Bundle is available starting TODAY (4 Jan 2024). I hope you’ve seen a bunch of new projects you want to make with it. I am so excited to make another card with it today.
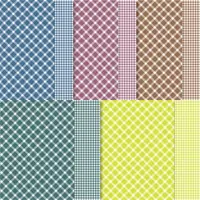
For this fun Z-Fold card I am using Basic White Thick for the card base and the Z. and Glorious Gingham 6″ X 6″ designer series paper in Berry Burst and Blueberry Bushel. I also used Granny Apple Green decorative panels. Let’s start making it.

My Basic White Thick card base is 4-1/4″ x 11″ scored at 5-1/2″ and 2-3/4″. I cut another Basic White Thick piece that is 1-1/2″ x 11″ and scored at 5-1/2″ and 2-3/4″ for the Z of the fun fold. My Glorious Gingham Berry Burst panel is cut to 5-3/8″ x 4-1/8″. The Blueberry Bushel panels are each 2-5/8″ x 4-1/8″. I used liquid glue to adhere the panels to the card base.
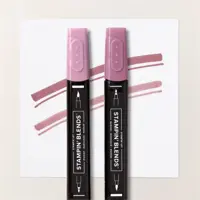
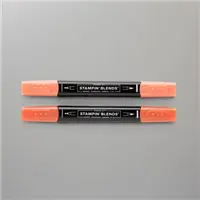
I cut a panel of Basic White Thick cardstock 5″ x 2-3/4″ for stamping. I stamped all images in Tuxedo Black Memento ink before coloring. I stamped the three flower grouping all the way across the panel at random heights but leaving the bottom of the flowers no more than 1/4″ above the cut. I randomly picked colors for the flowers as I wanted a variety. I used (all lights) Sweet Sorbet, Cajun Craze, Moody Mauve and Bubble Bath Stampin’ Blends for the petals. For the leaves I used light and dark Old Olive and Granny Apple Green Stampin’ Blends. The flower centers are colored with light (outer) and dark (center) So Saffron, Wild Wheat, Crumb Cake and Pumpkin Pie Stampin’ Blends.
I used my previously made cow punch pattern to stamp the body, 2 heads and horns. I stamped a left facing cow body and fussy cut it. In our neck of the woods we have a herd of red cows (maybe Red American) owned by a neighborhood family. I pass by these “friends” on my way to and from work. The red cow on my card is, therefore, a neighborhood cow colored in light and dark Cajun Craze Stampin’ Blends with light Petal Pink Stampin’ Blends hooves. My other cow is colored in light Basic Black (spots and tail) dark Smoky Slate (face and back leg) and light Smoky Slate (nose and body) with light Petal Pink Stampin’ Blends hooves and horns.

I stamped the sentiments on piece of 2-3/8″ x 2-3/4″ Basic White Thick. I used Granny Apple Green ink for the center and Berry Burst ink and Blueberry Bushel ink for the outside stamping. I stamped the top and bottom Holy Cow! in Berry Burst. I turned the paper to the long side and stamped with Blueberry Bushel on both sides, facing out. I adhered the panel to the DSP with liquid glue.
I stamped the medium chicken three times using Tuxedo Black ink on Basic White Thick card stock. I colored the comb, waddle and tail feathers in light Sweet Sorbet Stampin’ Blends and the beak in light Pumpkin Pie Stampin’ Blends. I colored one chicken in light and dark Pebbled Path Stampin’ Blends, one in light and dark So Saffron Stampin’ Blends and left the last one white. And then – I fussy cut all three chickens. Yes, we’re fussy cutting again, friends. It must be something in the air…
I cut the Granny Apple Green card stock to 5-3/8″ x 1-3/8″ and two pieces at 2-5/8″ x 1-3/8″. I adhered these panels to the 11″ strip. Now, it may be obvious to you, but it wasn’t to me. The longest part of the Z will be attached to the left (front) of the card and the shorter on the right (inside) of the card. I initially placed it backwards and couldn’t figure out how it was supposed to close flat.
I used the Cutest Cow Stamp Set grass stamp and stamped the Granny Apple Green cardstock with Granny Apple Green Ink. I closed the card with the Z in place and determined placement of the two cows. When closed, I wanted the card to show both cows (but not the chickens). I adhered the Slate/Black cow on the right side of the long end of the Z with Stampin’ Dimensionals. I adhered the red cow to the back of the right side of the Z. At this point, I adhered the Z to the card base on the left and right sides with liquid glue. Then, I adhered the Pebbled Path and white chickens to the Z strip, leaving room for the third chicken. I cut thin Stampin’ Dimensionals and added them to the back of the So Saffron chicken and placed it in the middle of the other two.

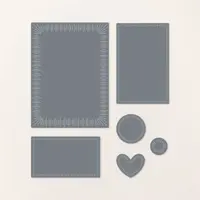
I created the front flower using the Bee Builder Punch. I’d love to say that I came up with this, but this flower is modified from one I saw posted by Heidi Collins with On Y Go! Stamping post. For the record, it works with other style hearts, too. I used the Bee Builder Punch to punch four (4) wings (hearts) from Berry Blast. I adhered them together in the center with liquid glue. I used the circle from the Radiating Stitches dies to cut a Blueberry Bushel cardstock flower center. I added Wink of Stella to the edges of the flower petals. When dry, I curled the petal edges with my bone folder before adding Stampin’ Dimensionals to the back of the flower and adhered it over the Z strip.
I added 2 butterflies to the front of the card and one large one above the flowers. When the card was opened, I added another large butterfly for the flowers near the fold and a small butterfly near the chickens for a total of 5 butterflies.

I used Lemon Lime Twist Glorious Gingham cut to 2-1/4″ x 6″ for the envelope flap. I stamped a milk can and a medium chicken standing on the milk can on the front of the envelope. I inserted a window sheet into the envelope and used light Basic Black and light and dark Smoky Slate Stampin’ Blends to color the can. I used light Sweet Sorbet Stampin’ Blends for the chicken comb and waddle, light Pumpkin Pie Stampin’ Blends for the beak and light and dark So Saffron for the chicken body.
Available today (4 Jan 2024):
- Cutest Cows Stamp & Punch Bundle – 162897 – $41.25
- Bee Builder Punch – 162553 – $22.00


Thanks for stopping by my blog today. I will be traveling to Illinois to see my daughter, mom and sister and all my family near Chicago. I anticipate having some easy cards on my blog next week and a FB Live on Sunday at 6:00 pm CST. If you’d like to join my free online card demonstration, please follow me on Facebook here or on YouTube here. If you make this card, please tag me on social media #stampwithnel. I’d love to see what you create.
Amy Koenders is next on the blog hop. Use the next button below to go to her blog. If you missed anyone along the way, simply click on her name below to go to her blog. I hope you enjoy your Jan – Apr 2024 mini catalog and Sale-A-Bration shopping today!

- Amy Koenders
- Mary Deatherage
- Jaimie Babarczy
- Karen Finkle
- Akiko Sudano
- Karen Ksenzakovic
- Tara Carpenter
- Carol Buckalew
- Nel Thames – This is me 🙂
Host Code
May 1 – May 31: Host Code: KGRFRDQK
If you do not already have a demonstrator, I’d be honored to be your Stampin’ Up! Demonstrator.
Use my host code when you order $50 (before tax and shipping) or greater and receive five (5) handmade cards and a variety of 6″ x 6″ double sided Designer Series Paper (a $20 value) FREE from me. You will also receive the monthly online tutorial. The May tutorial features the Adventurous Sky Bundle.
***Make sure that you can see my name, Nel Thames, on the final checkout page listed as your Demonstrator when you order so that you know that you’re ordering with me and you’ll get my rewards! If you forget to add the host code I am not able to add it for you due to privacy reasons. You can call Stampin’ Up! and requested that it be added. Thank you for understanding.

Retired Stampin’ Up! Products
My online Stampin’ Up! retired product store has been refreshed with additional products. I will be adding more retired products as I come across them. I have a variety of stamps, dies and embellishments. My stamps and dies are all gently used and most were purchased within the last two years (although some may be “vintage”). Dies might be on magnet cards as I did not start saving the original packaging until just recently. Designer Series Paper and embellishments are new in unopened packages unless otherwise stated.
Due to Stampin’ Up! policies, I can only ship to U. S. addresses.
Shop my online store here.


What a CUTE card! Love the z fold too.
Thank you so much, Terry Lynn.
Yep, I love this. And I don’t usually go for cutesy cards. However, this one is adorable. Now I have to add it to my wish list. Love the fun fold too.
I agree – cutesy isn’t usually my thing, but this bundle is just adorable. Enjoy!
Beyond adorable! I love the Z-fold, too – it’s a perfect little farm scene!! 🙂
Thanks so much, Mary.
That’s so cute!! I love the back cow peeking out and all the flowers! 😊
Too cute! I love this little set! Can’t wait to get mine tomorrow! TFS
It’s so fun. I know you’ll enjoy it.
Too cute Nel! Love the fun fold design, so sweet!! 🙂
Thanks Amy.
Oh my gosh! What an adorable card, Nel! I love the fun fold, too…perfect to showcase these adorable critters!
Thank you Carol.
Nel, that certainly is the cutest cow!
Thank you so much.
OMG this is just too cute Nel 🙂 Perfect fold and DSP to go with those adorable cows.
Thank you Karen.